Posted on — Leave a comment

Fun and Effective Ways to Memorise Musical Terms: Grades 1–5

Fun and Effective Ways to Memorise Musical Terms: Grades 1–5

Have you ever learnt a musical term, felt sure you knew it, and then completely forgotten what it meant when you needed it?

Music theory involves quite a lot of vocabulary, particularly as you progress through the grades. Many of the terms are Italian, with French and German terminology appearing as you move further through the syllabus.

But learning musical terms does not have to mean memorising long lists of words and definitions.

One of the most effective ways to remember them is to turn them into pictures, characters, funny sentences or little stories.

The sillier the story, the more likely you are to remember it!


A Memory Trick I Still Remember from Childhood

When I was learning music theory as a child, I needed to remember:

meno mosso = less movement / slower

For some reason, I imagined men walking through moss.

Picture a group of men trying to walk through thick, sticky moss. They can hardly move their feet!

Men + moss = meno mosso.

Because they are struggling to get through the moss, they are moving less and therefore walking more slowly.

It is a wonderfully silly picture — but that is precisely why I still remember it.

And that is the point of a good memory trick. It does not have to be sensible or sophisticated. It just needs to create a picture that your brain can easily bring back.

Even after all these years, meno mosso makes me think of men walking through moss.

That childhood memory is a good example of how much easier musical terminology can become when you turn a word into a little story rather than simply trying to memorise its definition.


Some Musical Terms Almost Tell Their Own Story

Once you start looking for them, some musical terms lend themselves particularly well to funny pictures and little stories.

Musical term Meaning A silly way to remember it
meno mosso less movement / slower Imagine men walking through thick moss. They can hardly move their feet!
ma but “Ma says I MUST tidy my room, BUT…”
lento slowly Len’s toe hurts, so he has to walk slowly. Len’s toe → lento.
grazioso gracefully Imagine Grace dancing gracefully across a stage.
grave slow and solemn Imagine standing beside a grave, walking slowly and solemnly.
poco a little Meet Poco, a cute little character who only wants a little piece of cake.
poco a poco little by little / gradually Poco takes tiny steps, one at a time — little by little.
presto very fast Imagine Press Toe running so fast that his shoes are pressing his toes!
più more You are given a tiny piece of cake and shout “PIÙ! I want MORE!”
più mosso more movement / faster The men escape the moss and start moving much more quickly.
vivace lively / brisk Viv is so lively that she simply cannot sit still.
volante  flying / fast think of a high speed volleyball flying through the air, or the volt energy of electricity
estinto as soft as possible, lifeless Dinosaurs are extinct and completely silent
lunga long pause looks like long or lung. Take a huge breath into your lungs for a long pause.
smorzando getting softer, dying away smorzando → smorz.🕯️ “SMORZ = candle going out.”
ritenuto held back / slower Imagine Rita running, then someone shouting, “Rita! Hold back!”

A Fun Way to Learn Musical Terms

The All-in-One Music Theory books for Grades 1–5 include crosswords, anagrams, stories and other activities to help make musical terminology memorable.

“Crosswords, anagrams and stories using Italian and French words…the book is worth every penny just for this section alone.”

— Rhinegold Music Teacher Magazine
See more reviews


A Few More Musical Characters

Here are some more musical terms that can be turned into little characters or scenes. You may find that one of these gives you an idea for your own memory tricks.

Musical term Meaning A silly way to remember it
molto very / much Imagine Molly wanting a very large amount of something — “Molly wants lots!”
con with Con says, “Come with me!”
con moto with movement Imagine Con on a motorbike, zooming along with plenty of movement.
senza without Senza orders a pizza without cheese.
non troppo not too much Someone is filling your glass and you quickly say, “That’s enough — not too much!”
largo slowly Imagine a drunk person who has had “larger” walking very slowly.
andante at a moderate, walking pace Dan is walking down the street.
dolce sweetly Picture a cute, sweet little doll singing a soft lullaby.
largamente broad / slow Imagine Larry going large, stretching his arms as wide as possible.
allargando broadening and generally slowing Al stretches his arms wider and wider as he gradually slows down.
espressivo expressively Imagine Esme expressing herself dramatically through music.
alla marcia in the style of a march Ella marches along with a very serious expression.
dal segno from the sign Dale sees the sign and knows he needs to go back to it.

Some short musical words appear again and again in longer expressions. Once you know what these little words mean, they can give you useful clues when you meet a new term.

  • meno = less
  • più = more
  • con = with
  • senza = without
  • poco = little / a little

For example:

  • meno mosso = less movement
  • più mosso = more movement
  • con moto = with movement
  • poco a poco = little by little
  • non troppo = not too much

Learning these small building blocks can make longer musical expressions much easier to remember.


Use Opposites to Make Things Easier

Learning contrasting words together can be particularly helpful.

meno = less
più = more

These two little words are useful building blocks for remembering longer expressions. Once you know that meno means less and più means more, the difference between meno mosso and più mosso becomes much easier to remember.

One word tells you there is less movement; the other tells you there is more.


Make the Music Come Alive

Some terms are especially easy to remember if you turn them into actions.

  • largamente — stretch your arms out as wide as possible.
  • presto — move as quickly as you can.
  • vivace — bounce around and refuse to sit still.
  • ritenuto — pretend to run, then suddenly hold yourself back.
  • allargando — gradually make your movements wider and slower.
  • poco a poco — take tiny steps, one at a time.
  • alla marcia — march around the room.

You could even ask someone to call out the musical terms while you act them out. This turns revision into a quick memory game rather than simply reading definitions from a page.


What About French and German Musical Terms?

The same approach works with French and German terminology too.

Rather than trying to memorise a long list of translations, look for something that gives each unfamiliar word a memorable association. A sound-alike, a character, an image or a short story can all work.

The exact terminology you need will depend on your grade and examination board, so it is useful to work from the relevant syllabus rather than trying to learn every musical term you come across.


For the grade-by-grade terminology covered by ABRSM, Trinity and VCM, see:

👉 Music Theory Syllabus Requirements: ABRSM, Trinity & VCM
👉  See ABRSM Grade 5 music Theory: New Terms You Need to Know


Make Up Your Own Memory Tricks

Once you have seen a few examples, try making up your own.

When you meet a term that you keep forgetting, ask yourself:

  • Does it sound like an English word or name?
  • Can I turn it into a funny picture?
  • Could it become a character?
  • Is there an obvious action I could imagine?
  • Does it have an opposite that I already know?
  • Can I make up a ridiculous sentence using it?

Your memory trick does not have to make sense to anyone else. It only has to work for you.

Perhaps lento makes you think of Len’s toe. Perhaps you invent something completely different. Both are perfectly good if they help you remember that lento means slowly.


The Best Memory Trick Is the One You Remember

Musical terms can seem much less daunting when you stop treating them as a list of foreign words and start turning them into things you can picture.

For me, it was men walking through moss.

For you, it might be a character, a funny sentence, a dramatic scene or a ridiculous image that you could never possibly forget.

So the next time a musical term refuses to stick, don’t just read the definition again.

Ask yourself:

“What could this word become?”

And if the answer is something completely silly, that’s probably a very good sign.

A silly story that you remember is far more useful than a sensible definition that you forget.
Posted on — Leave a comment

Finding Notes Faster: Pattern Recognition, Musical Stories & Ledger Lines

How to read ledger line notes fast

How to Read Music Notes Faster: Pattern Recognition & Ledger Lines

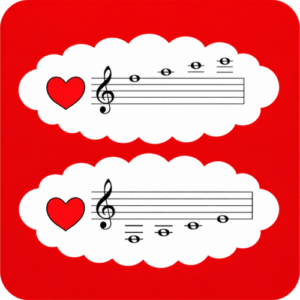
One of the biggest hurdles for music theory students is learning to recognise notes quickly and confidently. Many beginners try to memorise every single note position separately, but this can become overwhelming — especially when notes move above and below the stave onto ledger lines.

A more effective approach is to look for patterns.

The All-In-One Music Theory Workbooks and Revision booklets take a different approach by encouraging students to understand the relationships between notes rather than simply memorising isolated facts. From the very beginning, students are guided to recognise patterns and develop the ability to work things out for themselves.

Pattern recognition before note names

A distinctive feature of the All-In-One approach is that students are introduced to pattern recognition early in the books, before they are expected to memorise individual note positions.

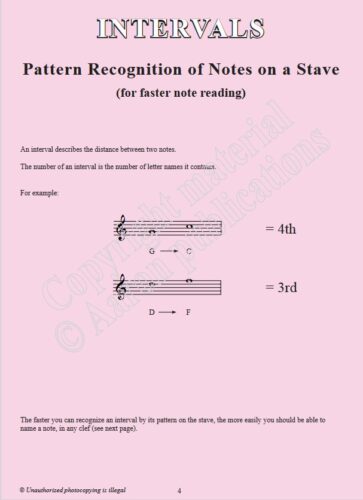
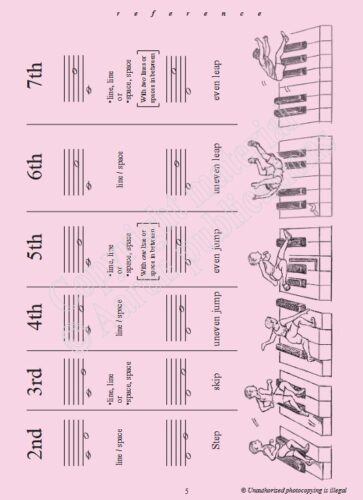
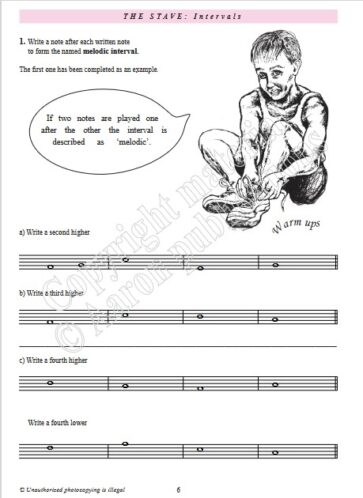
The section “Pattern Recognition of Notes on a Stave (for faster note reading)” encourages students to look at the shapes and relationships between notes first. By identifying intervals and recognising the distance between notes, students begin to understand how music notation works before they are asked to attach names to every position.

This is a powerful way to develop confidence at reading music notation in any clef, because students learn to see music as a series of patterns rather than a collection of individual notes to memorise.

Once the patterns of the stave become familiar, reading notes becomes much quicker, more logical and more enjoyable.

Recognising patterns on the stave

Notes on the stave follow predictable patterns and the shape of an interval stays the same no matter where it appears on the stave.

Instead of asking, “What is this note?” every time, students can begin to recognise the shape and position of notes more naturally.

This is similar to reading words. Experienced readers do not spell out every letter individually — they recognise familiar patterns and combinations. Musicians develop the same skill when reading notation.

A simpler way to learn note names across the stave.

Alongside developing pattern recognition skills, the All-In-One Music Theory books introduce a simple mnemonic system to help students quickly identify notes across both the treble and bass staves.

Unlike traditional methods that often use separate mnemonics for the treble and bass clefs (and additional ones for lines and spaces), this approach uses one continuous mnemonic that spans both staves. It can then be split into two easy-to-learn sections, meaning students only need to remember two short mnemonics rather than four.

This reduces the amount of memorisation required while helping students see the relationship between the treble and bass staves as one connected system. Combined with pattern recognition, this gives students a practical and efficient way to build faster note-reading skills.

Ledger lines are not extra notes to memorise

Ledger lines can seem intimidating because they extend beyond the familiar five lines of the stave. However, they are not separate from the stave — they simply continue the same pattern.

The important thing is not to memorise dozens of new positions. Instead, students learn to recognise landmarks and use the pattern to find the answer.

Ledger line note, pattern recognition. Learn how to read music notes faster
Small excerpt from the six page ‘L:edger Line lament’ found in All-In-One to Grade 5 and All-In-One: Grades 1-3


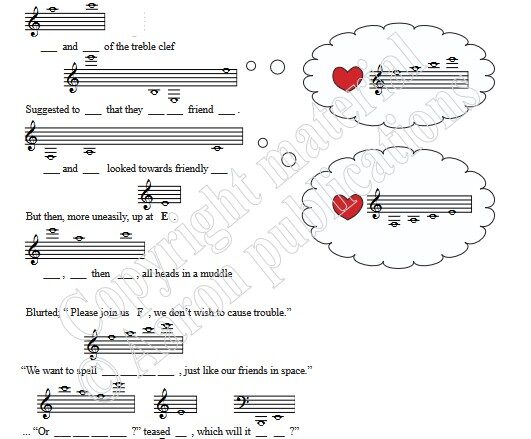
This example from All-In-One Music Theory shows how note recognition can become a fun discovery activity. While FACE is commonly associated with the spaces of the treble clef, this example extends the idea further, with ledger line notes spelling FACE and allowing students to uncover the pattern themselves within the story. It shows how familiar note patterns can continue beyond the stave into ledger lines in both the treble and bass clefs. Rather than being given another fact to memorise, students discover a memorable connection between the notes and the music.

Learning through musical stories

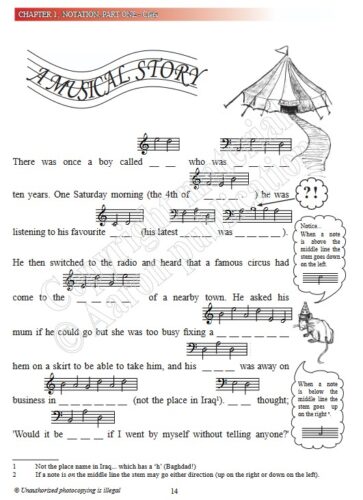
How to read music notes faster. bass-treble-clef-musical-story-example.
One page from a six page Musical Story for practice at reading notation in the treble and bass clef


Another special feature of the All-In-One Music Theory books is the inclusion of 12 pages of musical stories that make note recognition fun, memorable and engaging.

These stories are entertaining while always remaining educational. They encourage students to look carefully at the notation, solve clues and discover patterns hidden within the music.

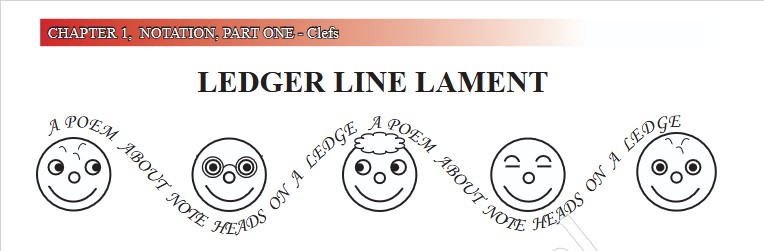
Ledger Line Lament - Note heads on a ledge
Title from ‘Ledger Line Lament’ – six pages

The ledger line example above is just a small part of this approach. Across 12 pages of creative musical storytelling, students practise note recognition in a way that feels more like solving a puzzle than completing a traditional theory exercise.

Understanding rather than memorising

This is the principle behind the All-In-One approach: giving students the tools to solve problems independently.

The aim is not just to pass a theory exam, but to develop genuine musical understanding and confidence. When students understand why notes are where they are, music theory becomes less like a list of rules to remember and more like a puzzle they can solve.

By combining pattern recognition, interval awareness, visual learning, carefully designed mnemonic tools and imaginative musical stories, All-In-One Music Theory helps students develop faster, more confident note reading skills through understanding rather than memorisation.


Posted on — Leave a comment

Chord Inversions Explained: Triads, Four-Part Chords and Figured Bass (Music Theory Guide)

Inversions of Four-Part Chords

Chord Inversions Explained: Root Position, First and Second Inversion

A chord inversion occurs when a chord is arranged so that a note other than its root is in the bass. For a triad, there are three possible positions: root position, first inversion and second inversion.

Understanding chord inversions is an important part of learning harmony and is particularly useful for students studying music theory and preparing for graded examinations.

Many students can recognise chords in root position, but inversions can initially seem confusing because the notes are rearranged and the bass note changes.

The All-In-One Music Theory books introduce chord inversions step-by-step through a highly visual approach, using illustrations, diagrams and carefully designed layouts with minimal text. This makes the presentation concise while still covering the subject in depth, from simple triads through to four-part chords and figured-bass notation.

The article below explains these concepts in a detailed, word-based format. They provide useful explanations online, but the full benefits of the All-In-One visual teaching method can only be experienced through the books themselves.


What Is a Chord Inversion?

A chord inversion occurs when the notes of a chord are rearranged so that a note other than the root becomes the lowest note.

For example, a C major triad contains:

C – E – G

When C is the lowest note, the chord is in root position.

When E becomes the lowest note:

E – G – C

the chord is in first inversion.

When G becomes the lowest note:

G – C – E

the chord is in second inversion.

The most important rule to remember

The inversion of a chord is determined by the bottom note.

It does not matter which note is at the top, or in what order the other notes appear above the bass. To identify the inversion, look at the lowest note.

The Three Types of Triad Inversions

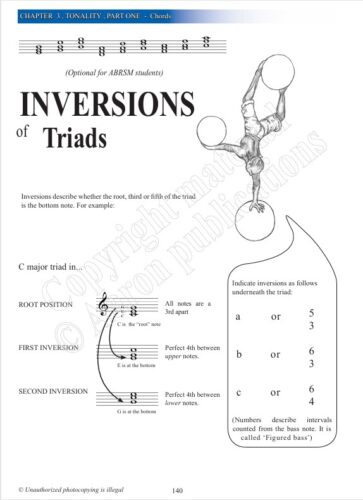
Image: Chord Inversions Triads
Chord Inversions Triads

Root Position (5/3)

In root position, the root of the chord is the lowest note.

Example: C major

Bass note: C

Notes: C, E, G

Figured bass:

5/3 — usually not written because it is understood.

First Inversion (6 or 6/3)

In first inversion, the third of the chord is the lowest note.

Example: C major

Bass note: E

Notes: E, G, C

Figured bass:

6/3, usually shortened to 6.

Second Inversion (6/4)

In second inversion, the fifth of the chord is the lowest note.

Example: C major

Bass note: G

Notes: G, C, E

Figured bass:

6/4

How to Identify a Chord Inversion

When identifying a triad inversion, use this simple method:

  1. Identify the notes in the chord.
  2. Work out the root of the chord.
  3. Look at the lowest note.
  4. Decide whether the bass note is the root, third or fifth.
  5. This tells you whether the chord is in root position, first inversion or second inversion.

For four-part chords, there may be a repeated note, so it is helpful to identify the three different notes of the chord first.

Why Are Chord Inversions Used?

Composers use chord inversions because they can create smoother and more interesting musical progressions.

Without inversions, chord changes can create large jumps between notes. Inversions allow individual voices, particularly the bass line, to move more naturally.

For example:

C → G → C

can become:

C → G/B → C

The bass line moves more smoothly, creating a stronger sense of musical flow.

This is one reason why understanding chord inversions is important when studying harmony. The same chord can have a different bass note and produce a different effect within a progression.

Understanding Four-Part Chord Inversions

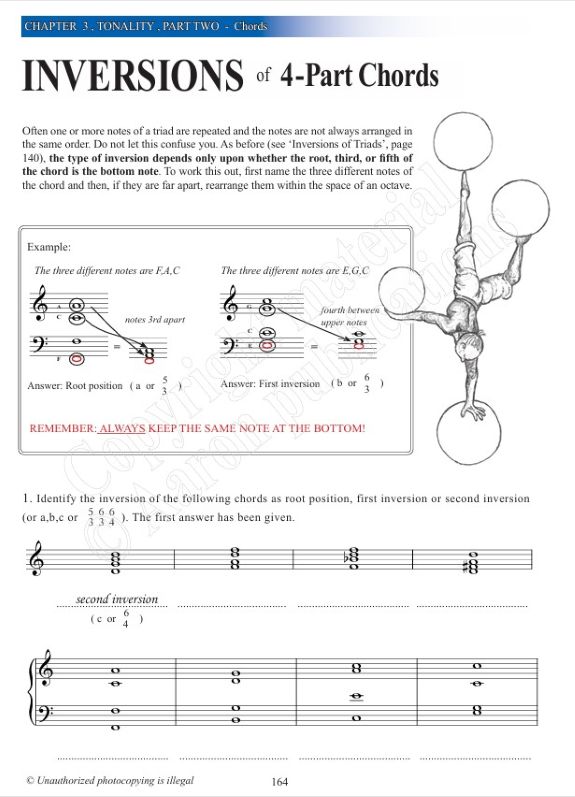
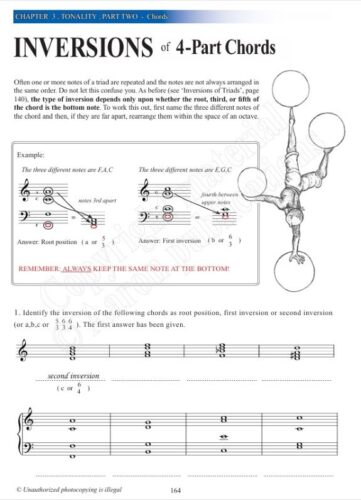
Image: Inversions of Four-Part Chords
Inversions of Four-Part Chords

Inversions of Four-Part Chords: Found in All-In-One to Grade 5 and All-In-One: Grades 4–5 workbook

Four-part chords can appear more complicated because one or more notes of the triad may be repeated.

A four-part chord usually contains:

  • Soprano
  • Alto
  • Tenor
  • Bass

Although the notes may be spread across two staves and arranged differently, the method for identifying the inversion remains the same.

Look at the bass note.

The bass note determines whether the chord is in root position, first inversion or second inversion.

How to Identify a Four-Part Chord Inversion

  1. Find the three different notes that make up the chord.
  2. Ignore any repeated notes.
  3. Look at the lowest note.
  4. Decide whether the bass note is the root, third or fifth.
  5. Identify the inversion.

Example

E – G – C – E

The three different notes are:

C, E and G

Because E is the lowest note, this is:

C major, first inversion.

The repeated E does not change the inversion.

Figured Bass and Chord Inversions

Figured bass is a system that shows the intervals above the bass note.

Understanding the relationship between figured bass and chord inversions can help students see why the figures change when the bass note changes.

The common symbols for triads are:

Root position:
5/3

First inversion:
6/3 or 6

Second inversion:
6/4

The numbers do not tell you the name of the chord. They show the intervals between the bass note and the notes above it.

This is why figured bass and chord inversions are closely connected.


Chord Inversions in the VCM Music Theory Syllabus

Chord inversions are included in the new Victoria College of Music (VCM) Music Theory syllabus. From Grade 3, students are tested on chord inversions, with the topic introduced simply and progressively as they develop their understanding of harmony.

This makes chord inversions an important area of study for VCM Music Theory students, as well as for those following other graded music theory syllabuses. Although figured bass becomes particularly relevant at Grade 6, introducing these patterns earlier can provide useful preparation and help students develop a stronger understanding of harmony.

You can see the full VCM Music Theory syllabus requirements, including how chord inversions are introduced at different grades.


Common Mistakes Students Make With Chord Inversions

Looking at the Wrong Note

The lowest note determines the inversion, not the highest note.

Forgetting Doubled Notes

Four-part chords often contain repeated notes. Always identify the three different notes first.

Thinking the Notes Must Appear in a Particular Order

The notes of a chord can be rearranged. They do not have to appear in a particular order above the bass.

The important point is the bass note.

Confusing the Chord Name with the Inversion

The chord name tells you which notes belong to the chord. The inversion tells you which chord note is in the bass.

For example, C–E–G, E–G–C and G–C–E are all forms of a C major chord, but they are in different positions.


Chord Inversions: A Simple Way to Remember Them

For a triad, simply look at the bottom note:

  • Root position: root in the bass
  • First inversion: third in the bass — a fourth between the upper two notes
  • Second inversion: fifth in the bass — a fourth between the lower two notes

For a C major triad:

C – E – G → Root position
E – G – C → First inversion
G – C – E → Second inversion

The notes of the chord have not changed — only the bass note has changed.

Once you understand this simple principle, chord inversions become much easier to recognise. You can begin to see more clearly how chords move, how bass lines are constructed and how harmony works within a piece of music.

Whether you are preparing for a music theory examination, developing your harmony skills, or simply wanting to understand how chords work, recognising chord inversions is an important step towards becoming a more confident musician.


Ready to Practise Chord Inversions?

👉 The clearest explanation of chord inversions, combined with plenty of practice exercises, is found in Chapter 3 of:

These books explain chord inversions step by step and provide plenty of opportunities to practise identifying and writing them.


Aural and General musicianship

For a practical musical example of chord inversions, see:

👉 Shostakovich Piano Tutorial: Waltz No. 2 – Chord Inversions and Hemiolas

This video demonstrates chord inversions in the context of an actual piece of music.


Moving from Grade 5 to Grade 6 Music Theory

If you are moving on from Grade 5 and beginning to study more advanced harmony, you may also find our guide Bridging the Dreaded Gap: How to Transition from Grade 5 to Grade 6 Music Theory Smoothly useful.


Chopin Ballade No.1 – How to fix a tricky descending scale run

Chopin Ballade No.1  – How to fix a tricky descending scale run

The Chopin Ballade No. 1 scale run is one of the most recognisable passages in the piano repertoire — and one that many pianists find tricky to play with confidence and evenness. In this short piano tutorial, I break down the descending scale run step by step, with practical tips to help you play it with greater confidence, evenness and musicality. 🎹✨

One of the things I find helpful is to slow the passage down and group the notes mentally while still keeping them even. This is purely a mental hack, but it can make a fast scale run feel much more manageable. It can also help to remember the underlying harmonic structure: here we have F7, followed by chord iv (notice that it’s minor, not major), then V and I in E-flat major.

As you build up speed, keep listening for evenness and clarity rather than simply trying to play faster. Practise slowly first, then gradually increase the tempo. Consistency is key!


🎥 Watch the scale passage in context of my full performance of Chopin’s Ballade No. 1.

(the descending scale runs occurs around the 7 minute mark)


Want to understand the theory behind passages like this?

📚All-In-One Music Theory books explain chords, harmony, Roman numerals and much more in a clear, practical way, with resources covering Grades 1–5.


← Back to Music Theory Video Tutorials


Posted on — Leave a comment

Identify Major Key Signatures (Without Memorising Every Key)

How to work out the notes of a Key signature with flats quickly and easily

How to Identify Major Key Signatures (Without Memorising Every Key)


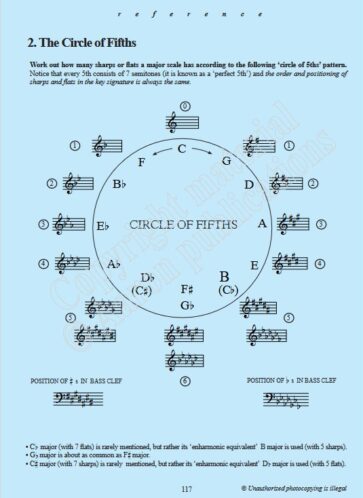
Identify Major Key Signatures SharpsIdentify Major Key Signatures Flats


Two of  fifteen Reference pages found in Chapter Three of  All-In-One to Grade 5, All-In-One: Grades 1-3 and All-In-One: Grades 4-5 books 

Learn how to identify major key signatures quickly and confidently using the simple patterns behind sharps and flats.

This guide is ideal for beginners and music theory students, including those preparing for ABRSM, Trinity College London, and Victoria College Music Theory exams.

However, this article is not a substitute for the All-In-One Music Theory workbooks and Revision booklets. While this online guide explains the subject in words, the books present these concepts through a highly visual approach, using diagrams, carefully designed layouts and minimal text to make music theory concise, clear and easier to understand and remember.

The full benefits of the All-In-One method can only be experienced through the books themselves. They provide a comprehensive, structured approach to music theory through Grade 5, offering far more than can be conveyed in an individual online article.

To experience the complete All-In-One approach, we recommend working from All-In-One to Grade 5 or All-In-One Grades 1–3 and All-In-One Grades 4–5.


Have you ever looked at a key signature and wondered:

“How do I know what key this is?”

Many students believe they need to memorise every major key signature. Fortunately, there’s a much easier way.

By understanding the order of sharps and flats, you can work out any major key quickly and confidently.

The secret is learning one simple pattern.


What Is a Key Signature?

A key signature is the group of sharps (♯) or flats (♭) written at the beginning of a piece of music, immediately after the clef.

It tells us which notes are altered throughout the music.

More importantly, it tells us the key of the piece.

The good news is that key signatures aren’t random—they follow clear, predictable patterns.


The Order of Sharps

Every sharp key signature follows exactly the same order:

F – C – G – D – A – E – B

A useful mnemonic is:

Father Charles Goes Down And Ends Battle

Taking the first letter of each word gives:

F C G D A E B

Each new sharp key simply adds the next sharp in this sequence.

Examples

Key Sharps
G major F♯
D major F♯ C♯
A major F♯ C♯ G♯

One Mnemonic Gives You the Order of Flats Too

Many students learn one mnemonic for sharps and another completely different one for flats.

You don’t need to.

Simply read the same phrase backwards:

Battle Ends And Down Goes Charles Father

This gives:

B – E – A – D – G – C – F

That’s the order in which flats appear.

So one phrase gives you both:

Sharps

F – C – G – D – A – E – B

Flats

B – E – A – D – G – C – F

Learning one pattern is much easier than memorising two separate lists.


How to Find a Major Key from a Sharp Key Signature

Once you know the order of sharps, identifying the key is easy.

Rule

The major key is the note immediately above the last sharp.

Example 1

Key signature: F♯

Last sharp: F♯

One note higher: G

Answer: G major


Example 2

Key signature: F♯ C♯ G♯

Last sharp: G♯

One note higher: A

Answer: A major


Example 3

Key signature: F♯ C♯ G♯ D♯

Last sharp: D♯

One note higher: E

Answer: E major

Remember: You don’t need to memorise every sharp key. Simply identify the last sharp and move up one note.


How to Find a Major Key from a Flat Key Signature

Using the order of flats:

B – E – A – D – G – C – F

the rule is different.

Rule

The major key is named after the second-last flat.

Example 1

Key signature: B♭ E♭

Second-last flat: B♭

Answer: B♭ major


Example 2

Key signature: B♭ E♭ A♭

Second-last flat: E♭

Answer: E♭ major


Example 3

Key signature: B♭ E♭ A♭ D♭

Second-last flat: A♭

Answer: A♭ major


The One Exception

There is one flat key signature that doesn’t follow the “second-last flat” rule.

With one flat (B♭), the key is:

F major

This is the only flat major key you need to remember separately.


Why These Patterns Work

These aren’t simply exam shortcuts.

They come directly from the circle of fifths , which shows how every major key is related.

  • Moving clockwise adds one sharp at a time.
  • Moving anticlockwise adds one flat at a time.

Because the pattern never changes, these rules work every time.

The Circle of Fifths


Test Yourself

Can you identify these major keys?

  1. F♯ C♯

Answer: __________

  1. B♭ E♭ A♭

Answer: __________

  1. F♯ C♯ G♯ D♯ A♯

Answer: __________

  1. B♭ E♭ A♭ D♭

Answer: __________


Ready to practise key signatures?

👉 This topic is covered in Chapter 3 of All-In-One to Grade 5, All-In-One: Grades 1-3 and All-In-One: Grades 4-5

Common Mistakes

Avoid these common errors:

  • Trying to memorise every key signature individually.
  • Forgetting that the order of flats is simply the order of sharps in reverse.
  • Using the last flat instead of the second-last flat.
  • Forgetting the one-flat exception: F major.
  • Looking at accidentals in the music instead of the key signature.

Learn the Pattern, Not the List

At All In One Music Theory, the goal isn’t simply to memorise facts.

It’s to understand the patterns that make music theory logical.

Once you know:

  • the order of sharps
  • the order of flats
  • how to identify the tonic

you can work out any major key signature with confidence.

This approach builds genuine understanding and prepares students for:

  • ABRSM Music Theory
  • Trinity College London Music Theory
  • Victoria College Music Theory

Understanding the pattern is far more powerful than memorising isolated facts.


The All-In-One Music Theory workbooks and Revision booklets teach the complete system, covering all topics from beginner to Grade 5, with explanations, examples and exercises.

Related:

How to Build a Major Scale Using Tones and Semitones

Learn how every major scale is constructed using the simple pattern of tones and semitones.

Posted on — Leave a comment

Why I wrote All-In-One Music Theory

Rachel Billings - Why I wrote All-In-One Music Theory

Why I wrote All-In-One Music Theory

by Rachel Billings

I thought it might be helpful to share a few thoughts in response to questions I’ve occasionally been asked—usually about All-In-One to Grade 5, the first book in the series and the most familiar. In total, there are ten books that make up the All-In-One music theory series.


Q. Why did you decide to write All-In-One music theory?

I didn’t exactly “decide” to write a music theory book or series. The material gradually accumulated from a collection of individual, self-contained worksheets originally created to support my own students and free up valuable lesson time for instrumental work.

(As noted in the Preface of All-In-One to Grade 5.)

I began gathering ideas during my first year of teaching in 2001–2002, while still a postgraduate student at the RNCM. Over several years, these worksheets steadily multiplied.

As I explain in the Preface:

“Most music theory books can be wordy and daunting for the beginner (especially if they are young) and often information is presented in an unrelated way through a graded system, which, in essence, relies on dry repetition and rote learning of facts.”

To address this, I aimed for an integrated yet progressive approach. The All-In-One method maintains overall progression while highlighting the simple rules and patterns underlying music theory. Once understood, these patterns apply consistently across all levels.

I also wanted students to gain confidence by understanding why musical rules exist, rather than simply memorising them. From the start, they are given the essential tools to work things out independently of the teacher.

The books were designed to be flexible and time-saving, allowing teachers to introduce topics when they are most relevant—for example, alongside pieces a student is currently learning.

Ultimately, the driving force was frustration. I wanted a clear, fuss-free and enjoyable approach to music theory, and I couldn’t find anything that suited my students—so I wrote it myself.


Q. How long did it take to write All-In-One to Grade 5 (and the series)?

From my first ideas through to the 2016 edition (and the books developed from it), the process took around fifteen years.

The first complete edition was finished in September 2008, after about five to six years of compiling material. Since then, the book has undergone substantial revision and improvement, particularly in later editions.


Q. Were there any memorable moments or particular challenges?

Yes—there were two main areas of challenge.

1) Writing and structuring the book

Once the individual worksheets existed, the next challenge was organising them into a coherent structure—deciding on order, progression, and how everything would link together.

At times, I had papers spread across my living room floor while trying to work it all out. I also needed to ensure the Part 1 and Part 2 structure worked smoothly while still supporting a natural teaching progression.

Later, the third edition brought further challenges, especially with significant changes to Chapter Three. The aim was to better support students working through graded exams (ABRSM and Trinity) while still preserving the integrated approach.

Adjusting the graded checklists to reflect these changes was particularly complex, but eventually everything was resolved.

One unexpected challenge was creating puzzles—especially Crossword Grandioso in Chapter Four. It was originally intended to be much smaller, but gradually expanded to 81 words as I kept trying to make it fit into a perfect square.


2) Producing the book on computer

By 2007, the worksheets already existed in handwritten form, but none were digitised. A huge amount of work was needed to bring everything into a publishable format.

At first, I considered outsourcing the computer work. However, I quickly realised that I needed full control over layout, spacing, and design. It became clear that I would have to learn the software myself.

At the time, my computer skills were very limited, so I taught myself desktop publishing and music notation software from scratch, often working late into the night after teaching. Online forums became an essential source of help.

Although it was demanding, the process gave me complete independence. I could make changes instantly and respond to ideas as they arose in teaching. Often, I would adjust worksheets immediately after lessons while the ideas were still fresh.

In hindsight, this freedom significantly shaped the final books. The ability to revise and refine continuously made the All-In-One approach possible in its current form.


All All-In-One music theory books are available at www.allinonemusictheory.co.uk / www.aaronpublications.co.uk, and in many high street shops, and through our distributor Music Exchange.


Posted on — Leave a comment

UK and US Music Theory Terminology: Note Values Explained

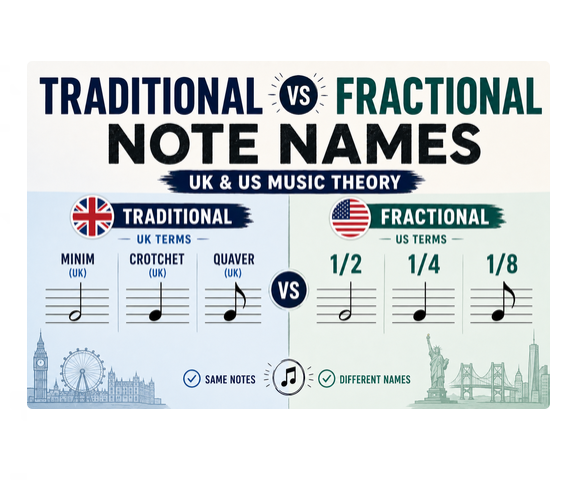
Traditional (UK) vs Fractional (US) Note Names

UK and US Music Theory Terminology: Note Values Explained

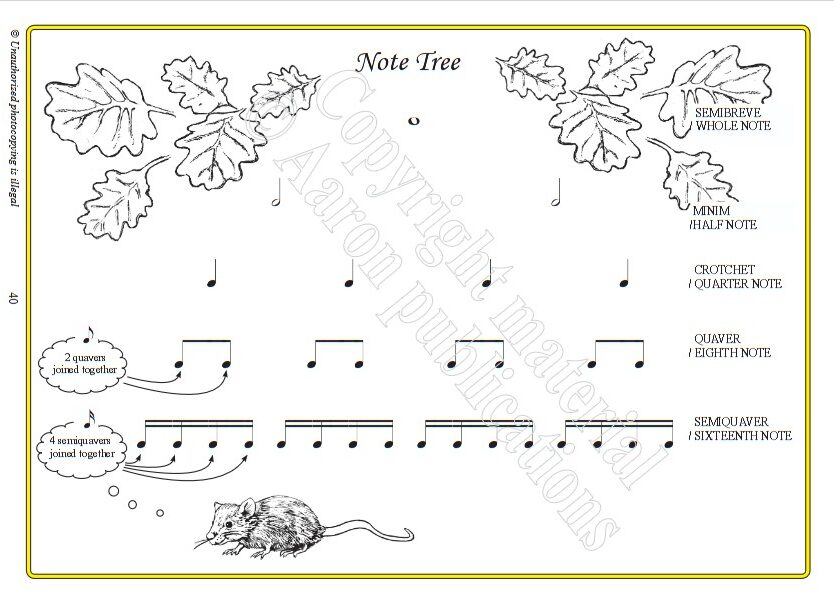
UK and US Note Value Terminology Explained


Music theory terminology differs between English-speaking countries, particularly in the naming of note values.

The notation itself is the same. The principal difference is the terminology used to describe it.

In the United States, note values are commonly described using fractional names:

  • Whole note
  • Half note
  • Quarter note
  • Eighth note
  • Sixteenth note
  • Thirty-second note

In the United Kingdom, note values are commonly described using traditional names:

  • Semibreve
  • Minim
  • Crotchet
  • Quaver
  • Semiquaver
  • Demisemiquaver

UK and US Note Value Names

US / Fractional Terminology UK / Traditional Terminology
Whole note Semibreve
Half note Minim
Quarter note Crotchet
Eighth note Quaver
Sixteenth note Semiquaver
Thirty-second note Demisemiquaver

These are different names for the same musical values.


All-In-One Music Theory Uses Both Systems

Although All-In-One Music Theory was developed in the UK, the books are designed to be accessible to students using either British or American terminology.

Both systems are taught throughout the books, rather than simply being mentioned in a terminology table.

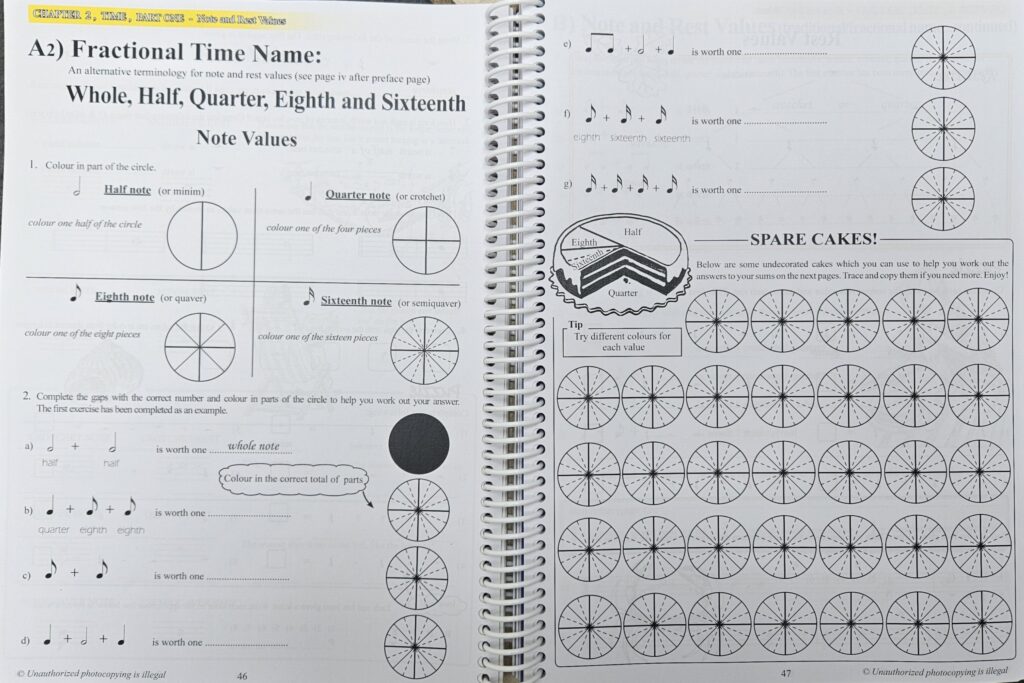
For example, in Chapter 2: Time, students encounter exercises using both traditional British names and American fractional names.

The same principle applies to rests.

For example:

  • Crotchet rest = quarter rest
  • Quaver rest = eighth rest
  • Semiquaver rest = sixteenth rest
    Rest Values puzzle using Fractional values: Whole, Half, Quarter, Eighth, Sixteenth

Why Teach Both Terminologies?

Understanding both systems is particularly useful for students who may encounter music education in different countries, working with different teachers, books, examination systems or musical resources.

An American student may learn about a quarter note, while a British teacher may call exactly the same symbol a crotchet.

A British student may learn about a semibreve, while an American teacher may refer to it as a whole note.

The terminology is different, but the musical value is the same.

Learning both systems can also help students understand the relationship between note values and time signatures. The fractional terminology makes the numerical relationships between note values particularly clear, while the traditional terminology remains an important part of British and international music education.


Other UK and US Music Theory Terminology

The differences are not limited to note values.

A table towards the front of All-In-One Music Theory explains major terminology differences in music theory and indicates where these terms are used in the book.

Other examples include:

UK terminology US terminology
Stave Staff
Staves Staffs
Bar / bar-line Measure / bar line
Semitone Half step
Tone Whole step

Where appropriate, All-In-One Music Theory uses footnotes and explanations to help students recognise these differences.

The aim is not to make students choose one terminology over another, but to help them understand the musical concepts and recognise the terminology used by different teachers and resources.


An American Music Teacher Asked About All-In-One Music Theory

An American music teacher once contacted me after seeing a sample page from the All-In-One Music Theory book.

Her question was whether the books would be suitable for American students, since American music education commonly uses fractional note-value names rather than the traditional British terminology.

She had noticed that a sample page from the book presents both UK and US terms side by side.

The answer is simple: students using All-In-One Music Theory can learn both systems.


In Chapter 2: Time, students encounter several pages of exercises using both terminologies.

A1 paper is titled:

‘Traditional Name: Semibreve, Minim, Crotchet, Quaver and Semiquaver’

A2 paper is titled:

‘Fractional Time Name: Whole, Half, Quarter, Eighth and Sixteenth’

In Paper B, students may answer questions using either system. These papers are then followed by a section on Time Signatures, which links directly to this topic.

The books also introduce other differences in English-language music terminology. For example, the Foreword includes a table of major terminology differences, while footnotes explain terms such as stave and staff where appropriate.


Want to Know More About Using All-In-One Music Theory in the USA?

All-In-One Music Theory was developed around the UK examination system, but the books use both British and American terminology and can be useful to students studying music theory outside the UK.

For more information about the books, UK examination grades and their suitability for American and international students, see:

Is All-In-One Music Theory Suitable for American Students?


Summary

The main UK and US note-value names are:

  • Semibreve = Whole note
  • Minim = Half note
  • Crotchet = Quarter note
  • Quaver = Eighth note
  • Semiquaver = Sixteenth note
  • Demisemiquaver = Thirty-second note

The same approach is used for rests and, where relevant, other differences in British and American terminology.

The musical notation remains the same; it is the terminology that differs.

Whether a student is studying in the UK, the USA, Canada or elsewhere, understanding both systems can make it easier to work with different teachers, books, examination systems and musical resources.

Posted on — Leave a comment

The Importance of Music Theory

the importance of music theory

The Importance of Music Theory

Music theory helps many musicians perform better and provides a window into the composer’s mind and intentions.

The importance of music theory should be widely recognised. It is with good reason that the ABRSM exam board says students must pass the Grade 5 Music Theory exam before they can take the Grade 6, 7 or 8 practical exam on their chosen instrument. Yet most students do not study music theory in their instrumental lessons. The result is a mad rush to prepare for Grade 5 Music Theory just a few months, or even weeks, before the exam, and many students are not prepared.

Why is theory not taught earlier as part of the instrumental lesson?

There are at least three reasons.

Lack of Time

The first reason is easy to understand: lack of time. There is already much to fit into an instrumental lesson: exercises, instrumental studies, pieces, aural training… The list goes on. Theory is too often tagged on at the end or forgotten altogether (until the exam date looms!).

The Fear That Theory Will Be Boring

Secondly, there is a real fear among teachers that they will bore their student if they open a theory book. After all, isn’t music theory boring?

Many people assume that it is, and sadly this attitude is found in many teachers. This is perhaps because many teachers teach as they have been taught themselves. The problem is that theory is taught by rote, and people are used to the old “jigsaw method”, whereby dry snippets of information are given bit by bit, in the hope that they will eventually piece together and make sense to the student. For many, that day never comes!

Concerns About Parents’ Expectations

Also, thirdly, a few teachers worry that the parent may misunderstand if they devote more time to music theory. After all, isn’t the child being sent to an “instrumental” lesson? Will the mum or dad object if occasionally the instrument is put to one side and they spend half their time looking at a theory book?

Music Theory and Composing

Obviously, it is hard, if not impossible, for a musician to write a piece of music if they have little theoretical knowledge. Which time signature is best to use? How do you group the notes and rests and beam the tails accurately? How do you indicate your intentions?

Basic knowledge is essential if the music is to be written clearly and legibly. Grade 5 theory also involves some knowledge about orchestral instruments in general. It would be ludicrous to write a piece for clarinet which cannot be performed because the notes are either too high or too low for the instrument. It would also be silly to write “accelerando” (which means to get gradually faster) when you actually wish to tell the performer to slow down (“rallentando”).

The importance of music theory for composers should be obvious.

Music Theory and Performing

Some musicians may object to any mention of the dreaded two words “music theory” and respond:

“But I’m not a composer, why bother? Anyway, I learn theory whilst learning a piece of music.”

That is true, to a certain extent, but the result is often mere surface knowledge. Yes, you may be told that 12/8 time signature means counting four dotted crotchet beats in a bar, or that the current piece you are learning is in B major, which has five sharps.

But does that make sense?

It has proven hard to remember rules presented in such an abstract fashion. But not only that; can you be satisfied with such meagre understanding? Don’t you wish to know why these particular numbers are chosen and the reason such rules and conventions exist?

Understanding How Music Works

Too often the response is: “Music theory isn’t important, let’s just get on with playing the instrument!”

But knowledge of music theory should be an essential ingredient in any music lesson since it can help a person to play better on their instrument.

This statement should not be misunderstood! Of course, some students, with a good ear, know instinctively how to phrase and shape a melody without much knowledge of music theory. However, for other students, to whom this does not come naturally, a little knowledge of the building blocks used to write a piece of music, whilst not guaranteeing a musical performance, can only be beneficial.

Music theory, after all, is largely about how music works.

All musicians (even non-pianists!) should know a little about chord progressions and the direction and feeling produced by certain chords written in a particular order (so-called “harmonic progressions”). Certain chords naturally create a feeling of tension and relaxation, which in turn dictates the way the melody is shaped.

At the basic level, this knowledge is about cadences. For example, an “Interrupted Cadence” (V–vi) creates a feeling of instability, whilst a “Perfect Cadence” (V–I) feels final and complete.

Understanding the Composer’s Intentions

Some chords are unusual for the period in which they are written; for example, a “diminished chord” in Classical music. It is good to be aware that the composer intended this chord for dramatic effect.

Anyone would find it helpful to memorise a piece of music if they know about its structure. We